Zelda Web link's Awakening Eagle fortress: mirror sign and Poseidon
If there is a dungeon in Zelda: Web link's Awakening that can rapidly confuse you, then it is the eagle fortress. Four floors, various courses, relying on which tinted blocks you turn on as well as the need to delve into the abyss in the appropriate areas. It is not surprising that to lose the overview in between. We attempt to assist you via the dungeon as a lot as possible.
- Locate the round, card and also the first pillar
- 2nd column, the compass and also the intermediate manager Minor
- 3rd column, beak and also the mirror sign
- the fourth pillar
- the method to the last manager
- Endless: Teufelsadler
Locate the round, card and also the first pillar
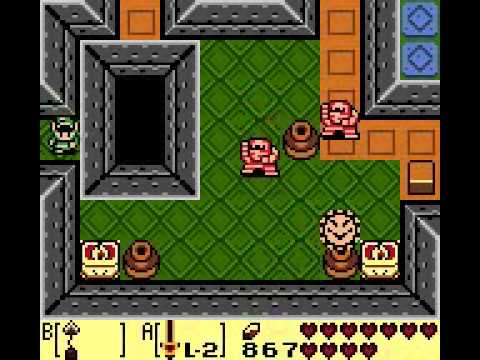
Go to the right and eliminate all the challengers on the screen. This offers you a key that you can use straight at the door above. Utilize the stairways in the north and then rise once again. Here you will certainly find the steel sphere , which you need to lug with all columns. Place them near the 2 blocks, pluck the turn on the right and run as promptly as you can most likely to the sphere, get it and also after that via the door. In front of you the initially column . Toss the sphere versus it and also allow it collapse.
Leave the sphere existing as well as goes to the room in the north. White on the ideal and also black left . A box appears with the map of the dungeon .
The objective of the dungeon is to ruin four pillars with a steel ball as well as thus bring the leading flooring to you. Obviously, you need the sphere for this.
2nd column, the compass and also the intermediate manager Minor
Collect the sphere again as well as go down to the base. Here you can throw the ball throughout the barricade directly to the 3rd column .
Go back to the area with the three challengers with the signs and also go down the stairways. On the upper floor it goes south, and you reach the intermediate boss Minor , which you already know from previous dungeons. As a reward you get a little crucial .
Instantly get the round as well as return to the room in the north. Program the block up and also choose the sphere through the outcome exposed. Then run via the passage in the north and do the opponents by activating three exact same signs on their stomachs with blows. The upper body that appears on it consists of the compass .
Remove back right into the space with the round and also depend on the corner to the right of the blue blocks. Jump from there diagonally to the southeast, and you reach the space south with the 2nd column . Go southern once again and hit the button. This gives heaven blocks down and also the red ones are increased. Return to the ball, which you can currently merely reach the 2nd column and toss them against it.
3rd column, beak and also the mirror sign
Go right from the one in charge space. Comes the opponents and a chest appears. You will certainly surpass her later, don't stress. Go on to the east. There you will reach a button that you need to change to blue with the sheet. Back in the one in charge room you let on your own drop in one of the holes on the left wall. Run up and also accumulate the magic shell from the box. After that jump to the lower degree and also go southern once more, where you can now reach the breast with the beak .
After that go down right into the hole alongside the switch. After that run up as well as you can collect one more little essential from the chest. Now you have to return to the room in which you have actually sunk the mirror indicator. Remain on the blue ceramic tiles as you fire versus the crystal button. Go southern, use the key on the block, then to the left and put the crystal switch with a ranged weapon on red. Currently, the path is clear to ensure that you can reach the area of the intermediate boss west.
Go north and then with the revolving door, which occurred to have body form on the. It was a long means, yet lastly you can shoot the iron ball against the third column .
From currently on it obtains a little complex. Comply with the red tiles up and after that to the eastern. For the 3 challengers once again. Activates the switch in the following space to make sure that it then depends on red. Back to the left as well as after that down up until you are forced to go to the. You should after that stand in a room with 2 blade traps as well as a mummy. Run south and go directly via the door to the north. Currently, you are on the opposite of the mummy catch. Take the stairs in the north, and also you ultimately get to the breast with the mirror shield .
the fourth pillar
In order to reach the last assistance, you will regrettably need to accept another detour. To do this, press the rock on the right into the abyss and afterwards throw the round over. Take it to the right, move the stone and take your freight down. You are now back in the space with the 2nd pillar. Decrease to the crystal button with the sphere as well as toss it over the obstacle. Currently, you have to get to the opposite side. It is most convenient if you teleport yourself to the entrance with the Karina, go left and also return to the room of the miniboss as well as from there to the right to the room with the ball. Grab them as well as return to the left into the room with the three card challengers, the chest and the owl. Most likely to the parapet and throw the sphere north.
You now need to go back to the sphere. Back to the miniboss area, after that north as well as once more north via the rotating door. To the right of the space with the flying flooring slabs you are now once again in the room with the remains of the 3rd column. In the south you can see a broken wall surface . If this, follows it, comply with the course as well as break another wall. So you get to the area in which you have actually thrown the sphere over the void. Draw yourself to the right with your enter hook, take the bombs out of your breast and grab the sphere with which you go north. There you can destroy the fourth column with the sphere and the leading flooring breaks down.
the method to the last manager
In the following area it goes north, then eastern as well as you get to another intermediate manager . It is best to place on your own in the top left and hit the sword at the lower right when the bats strike.
Poor news: You have to go back to the other side of the previous space. Take the courses to the miniboss area (for the last time, guaranteed), then to the right until you reach the crystal switch with the parapet.
It includes the large crucial . Incline against the crystal switch so that it stands on red as well as goes back to the previous room. If you still require a strange balm , you can solve a little chess challenge in the north of the map.
The various other two strikes are more of your benefit. Either the evil one eagle races towards you, or he begins a loss assault. With both assaults you can just strike the sword to disturb it. After a couple of strokes you crash, you get the common heart component as well as the method to the Poseidon body organ is complimentary.
In the following room it goes north, then east, and also you reach another intermediate boss . After a few strokes you crash, you obtain the typical heart part and also the means to the Poseidon organ is free.
You have already done the eagle citadel and also have one step better to get up the wind fish.
White on the appropriate and also black left . On the upper flooring it goes south, and also you reach the intermediate boss Minor , which you currently know from previous dungeons. Leap to the lower degree and also go southern once again, where you can now reach the upper body with the beak .
The adversary eagle has three strikes. One of the most harmful is the plume attack. He hovers in one of the corners, shoots on you with pen while gusts of wind attempt to push you off the tower. Run against the wind, if required with sprint, and also take the register if a pen must hit you.


Comments
Post a Comment